It has to be Pro to Downgrade Windows 8!
In Microsoft’s License terms they will allow you to Downgrade Windows 8 to Windows 7 but unfortunately it has to be the Professional version. So you will need;
- Windows 8 Professional Key (more about this later)
- Windows 7 Professional Media (DVD or USB) For clean versions of Windows 7 see my other post https://agtcs.co.uk/////windows-7-direct-downloads/
Find your Product Key
The most important thing to do is to find your product key, with windows 7 this used to be a sticky lable on the bottom of your laptop/computer, now they it’s imbeded into your laptop which you can’t physically see. This is great when installing windows 8 because it automatically finds the key and activates! but when downgrading to windows 7 this can be a pain. To find your windows 8 key you have a couple of free options see here;
- Magic Jelly Bean – http://www.magicaljellybean.com/keyfinder/
Make sure you keep your product key in a safe place, if everything goes wrong and you want to revert back to windows 8 you will need this key.
Do your Driver Homework
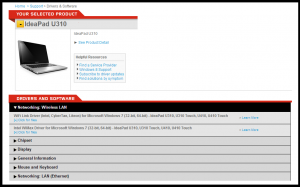
This next step is equally important, you will need to find out if you hardware supports windows 7. For this you will need to visit the manufactors website and check out the drivers – for todays example i am using a Lenovo Ideapad U310 UltraBook.
As you can see from the screenshot below the laptop was purchased for windows 8 pro but DOES support windows 7. I have downgraded a few windows 8 pro laptops recently and the wireless driver was the one i had the most problems with so just triple check it clearly has one like below.
Backup!
Please backup all your music, documents, pictures, movies, favourites, and any program license keys! the next step is where we wipe everything!
Change UEFI Settings and Enable Legacy Boot
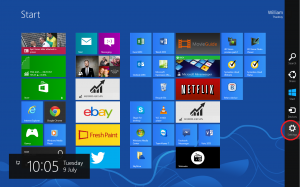
Next, we need to change the bios settings, please follow my instructions as booting straight into the bios by pressing the del key, will for some unknown reason make windows 7 crash during installation. So first hover to the bottom right corner and open up the charms bar and click on the gear icon.
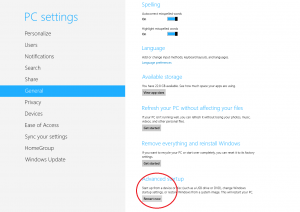
Click Change PC Settings at the very bottom, then into general on the left hand side, scroll to the bottom on the right hand side and click Restart now underneath Advance Start Up.
This will open up a blue screen, select troubleshoot, advanced options, then select UEFI Firmware settings, then restart.
This will open up your bios screen, in the advanced settings part of this screen you may have a few different options and is really down to how the bios is written, take a look at these examples that it could be;
- Enable Legacy boot from UEFI boot
- Disable UEFI boot.
- Disable Secure Boot
In my case i had to change the boot mode, see below.
Installation and Activation
While you’re in the bios change the boot order either USB, CD/DVD, or Network and save settings then reboot. After you have installed windows 7 with ALL!!! Drivers, it is the time to activate. For this you will need to click on windows activation, click on the telephone activation and you will need to speak with an advisor. Tell them you have windows 8 pro and you are downgrading to windows 7 pro, give them your key over the phone and they will convert it into the numeric id that you will need to enter into the activation box and this will give you the fully genuine actvated version of windows 7 and we are done!
PLEASE NOTE every time i have phoned windows for telephone activation a couple of the call centre people did not know what i was on about and they said i can’t do it, i had to put the phone down and re-dial until somebody knew what to do.
 01772 916 916


